使用Ant编译出现“找不到符号”错误原因与解决方法
这两天做写Ant脚本打包和部署项目.期间遇到一个问题,花了两三个小时解决.真郁闷..笔记下下.
问题描述如下:
使用Ant脚本编译打包程序时出错,出错信息:“找不到符号”,检查编译程序出来的代码无误,也确保需要的jar包已经引入。
后来偶然发现目录中存在一个早期版本打成的一个同名的jar包.而我写的ant脚本加载器又是优先加载旧版本的jar包.因此识别到的类没有新项目中所用的方法.自然就报"找不到符号"的错误了.
解决方法:
1.最根本的办法:就是去除旧版本的包,然后重新编译即可.
2.不除去旧版本包,可以优先加载新版本的jar程序.
ORA-01034 ORACLE not available ORA-27101 Shared memory realm does not exist错误解决方案.
解决好创建实例问题之后,使用PL/SQL连数据库报如下错误:
ORA-27101 Shared memory realm does not exist
ORA-01034 ORACLE not available
谷歌了很久很久,才找到解决方案,网上大多数方案都不行.很佩服这个牛人.
偶不是Oracle专家,不说原因了..直接说明怎么解决问题的吧.
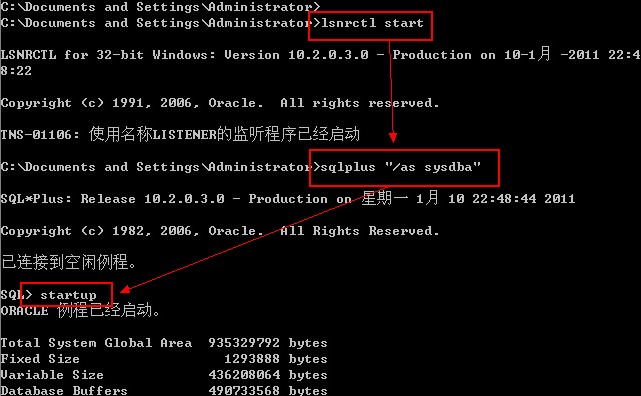
1.打开命令窗口输入:lsnrctl start
2.出现监听程序启动成功之后,继续输入: sqlplus '/as sysdba'
3.连接成功后输入startup
4.出现成功信息后再使用PL/SQL登录,发现登录成功.
贴个截图:
Oracle服务误删除的解决办法(360搞的)
之前有一次遇到这个问题,ORACLE.exe莫名奇妙的被360给删除了,上次选择了还原系统来解决,这次不知何时又被删除了.害我搞了一个晚上
无奈之下只好百度谷歌到处搜索.搜索到如下命令可建Oracle实例.(可弄成一个bat文件)
oradim -NEW -SID orcl -STARTMODE manual -PFILE F:\oracle\product\10.2.0\admin\ORCL\pfile\initorcl.ora"
oradim -STARTUP -SID ORCL -STARTTYPE inst
其中红色部分为自己的Oracle实例.
顺便贴个删除Oracle实例的命令:
oradim -DELETE -SID orcl
完成之后重启便可.
若登录数据库时出现如下错误 :
ora-01034:oracle not available
ora-27101:shared mermory realm does not exist
EhCache基础知识学习笔记
项目需要,稍微过了一下有关EhCache缓存框架的知识.
简单介绍下EhCache:EhCache 是一个纯Java的进程内缓存框架,具有快速、精干等特点.
一些不太经常变化的数据可以放入缓存,需要时候直接从缓存获取,可以提供系统的性能.
具体来看一下ehcache的知识吧.
ehcache需要一个xml配置文件:
内容如下:
<?xml version="1.0" encoding="UTF-8"?>
<ehcache>
<!-- 缓存数据文件创建的地方,java.io.tmpdir是默认的临时文件路径 -->
<diskStore path="java.io.tmpdir"/>

	    <!-- Sets the path to the directory where cache .data files are created.
	    	  设置为缓存的地方。数据文件创建的目录的路径

	         If the path is a Java System Property it is replaced by
	         its value in the running VM.
	                        如果路径是Java系统属性中被替换其值在运行虚拟机。


	         The following properties are translated:下列属性换算
	         user.home - User's home directory           用户的主目录
	         user.dir - User's current working directory 用户的当前工作目录
	         java.io.tmpdir - Default temp file path     默认临时文件路径
	    <diskStore path="java.io.tmpdir"/> -->

	    <!--Default Cache configuration. These will applied to caches programmatically created through
	        the CacheManager.
		默认的缓存配置。这将适用于通过编程方式创建缓存在CacheManager。

	        The following attributes are required: 下面的属性是必需的

	        maxElementsInMemory            - Sets the maximum number of objects that will be created in memory
                                                 设置对象的最大数量,将在内存中创建
	        eternal                        - Sets whether elements are eternal. If eternal,  timeouts are ignored and the
	                                         element is never expired.
	                                         设置元素是否是永恒的。如果永恒的,超时被忽略,并且元素是永远不会过期(缓存是否永远不销毁)
	        overflowToDisk                 - Sets whether elements can overflow to disk when the in-memory cache
	                                         has reached the maxInMemory limit.
	                                         设置当缓存中的数据达到最大值时,是否把缓存数据写入磁盘

	        The following attributes are optional: 以下属性是可选的
	        timeToIdleSeconds              - Sets the time to idle for an element before it expires.
	                                         i.e. The maximum amount of time between accesses before an element expires
	                                         Is only used if the element is not eternal.
	                                         Optional attribute. A value of 0 means that an Element can idle for infinity.
	                                         The default value is 0.
	                                         设置 当缓存闲置指定时间,当闲置时间到达指定时间时,缓存则自动销毁,可选的属性。
                                                 0值表示一个元素可以闲置无穷。默认值是0

	        timeToLiveSeconds              - Sets the time to live for an element before it expires.
	                                         i.e. The maximum time between creation time and when an element expires.
	                                         Is only used if the element is not eternal.
	                                         Optional attribute. A value of 0 means that and Element can live for infinity.
	                                         The default value is 0.
                                                 设置当缓存创建之后到达的指定时间,当缓存生存超过指定的时间,缓存则自动销毁
                                                 可选的属性。0值表示和元素可以活无限。默认值是0
	        diskPersistent                 - Whether the disk store persists between restarts of the Virtual Machine.
	                                         The default value is false.
                                                 无论是磁盘存储之间仍然存在的虚拟机重新启动。默认值是false
	        diskExpiryThreadIntervalSeconds- The number of seconds between runs of the disk expiry thread. The default value
	                                         is 120 seconds.
                                                 磁盘之间的到期线程运行的秒数。默认值是120秒
	        -->

    <defaultCache
        maxElementsInMemory="100000"
        eternal="false"
        overflowToDisk="true"
        timeToIdleSeconds="60"
        timeToLiveSeconds="120"
        />

	<cache name="systemConfigCache"
       maxElementsInMemory="100000"
       eternal="false"
       overflowToDisk="true">
    </cache>

</ehcache>
以上的一些翻译是结合google翻译和一些自己的理解.ehcache涉及的配置元素和属性说明都在上头了.
以下是Java代码部分,描述了一些关于Ehcache的简单使用和一些API,具体其他的API就参考具体文档咯..
//必须导入commons-logging.jar
public class EhCache {

	//默认缓存配置路径
	public static String DEFAULT_CACHE_CONFIG_PATH = "conf/ehcache.xml";

	public static void main(String[] args) {
		//使用指定的配置文件路径创建缓存管理器
		CacheManager cacheManager = new CacheManager(DEFAULT_CACHE_CONFIG_PATH);
		//获取配置的缓存Cache名字
		String [] cacheNames = cacheManager.getCacheNames();

		//会在当前classpath中去寻找ehcache.xml配置文件
		CacheManager cacheManager1 = new CacheManager();
		//或者 CacheManager.getInstance();
		//或者CacheManager.create();

		//由缓存管理器中获得缓存,可以是配置在文件中的缓存也可以是代码中new出来的.
		Cache cache = cacheManager.getCache("systemConfigCache");

		//数据放入缓存
		cache.put(new Element("key", "value"));

		//更新缓存数据
		cache.put(new Element("key","value2"));

		//获取缓存的值(序列画值)
		Element element = cache.get("key");
		Serializable value = element.getValue();

		//获取缓存的值(对象值)
		Object object = element.getObjectValue();

		//移除缓存数据
		cache.remove("key");

		//取得缓存中的属性maxElementsInMemory,其他的值类似
		int maxelementsInMemory = cache.getMaxElementsInMemory();

		String name = "codeCreateCache";  //缓存名字
		int maxElementsInMemory = 1000;   //缓存可以存储的总记录量
		boolean overflowToDisk = false;   //当缓存中的数据达到最大值时,是否把缓存数据写入磁盘
		boolean eternal = true;           //缓存是否永远不销毁
		long timeToLiveSeconds = 60;      //当缓存闲置指定时间,则自动销毁
		long timeToIdleSeconds = 120;     //当缓存创建之后到达时间自动销毁

		//代码中创建缓存
		Cache cache2 = new Cache(name, maxElementsInMemory, overflowToDisk, eternal, timeToLiveSeconds,
				timeToIdleSeconds);

		//添加缓存
		cacheManager.addCache(cache2);

		//移除缓存
		cacheManager.removeCache("systemConfigCache");

		//卸载缓存管理器
		cacheManager.shutdown();
	}
}
使用起来还是挺方便的,如果有其他需要也可以基于上面封装满足自己的缓存框架.
CAS单点登录用户名中文乱码问题解决方案
做项目使用CAS做单点登录时发现用户名输入中文名,后台日志打出居然是个乱码,自然就匹配不到数据库中的数据了..Google了一下,在CAS项目的web.xml写一个编码过滤器,可以使用Spring提供的一个编码过滤器,配置如下:
	<filter>
		<filter-name>encodingFilter</filter-name>
		<filter-class>org.springframework.web.filter.CharacterEncodingFilter</filter-class>
		<init-param>
			<param-name>encoding</param-name>
			<param-value>gb2312</param-value>
		</init-param>
		<init-param>
			<param-name>forceEncoding</param-name>
			<param-value>true</param-value>
		</init-param>
	</filter>
	<filter-mapping>
		<filter-name>encodingFilter</filter-name>
		<url-pattern>/*</url-pattern>
	</filter-mapping>
注意:以上过滤器应配置在所有过滤器之前.
再测试,中文用户名测试通过.
JavaScript关闭子窗口时刷新主窗口方法
JavaScript关闭子窗口时刷新主窗口方法是:
在子窗口的<body>中加入onunload事件加入:window.opener.location.reload();
即:<body onunload="window.opener.location.reload();">即可
Oracle出现ORA-12514:TNS:监听程序当前无法识别连接描述符中请求的服务解决方法
遇到此问题多次了,于是决定记一下.
找到listener.ora文件打开,
|
# listener.ora Network Configuration File: f:\oracle\product\10.2.0\db_1\network\admin\listener.ora # Generated by Oracle configuration tools. SID_LIST_LISTENER = (SID_LIST = (SID_DESC = (SID_NAME = PLSExtProc) (ORACLE_HOME = f:\oracle\product\10.2.0\db_1) (PROGRAM = extproc) ) (SID_DESC = (GLOBAL_DBNAME = ORCL) (ORACLE_HOME = f:\oracle\product\10.2.0\db_1) (SID_NAME = ORCL) ) ) LISTENER = (DESCRIPTION_LIST = (DESCRIPTION = (ADDRESS = (PROTOCOL = TCP)(HOST = localhost)(PORT = 1521)) (ADDRESS = (PROTOCOL = IPC)(KEY = EXTPROC0)) ) ) |
上面红色标记部分为增加的部分,根据具体数据库安装的不同,分别更改GLOBAL_DBNAME、ORACLE_HOME、SID_NAME三个值,然后重新启动Oracle服务即可
生成javadoc时生成包说明的方法
利用Eclipse生成的javadoc是没有输出包说明的,如何才能使javadoc输出包说明呢?方法如下:
在每个包下建立一个package.html,该html中<body>中所指定的内容就是javadoc输出时包名的描述
例如:在html中指定如下:
<body>
缓存工具集,提供平台公共的缓存工具.
</body>
则显示效果如下:


关于Arrays.asList的问题
将数组转成List问题,通常我们习惯这样写成:List<String> list = Arrays.asList("1","2");
于是我们这样就得到了一个list,但是这个List的实现类是java.util.Arrays.ArrayList这个类(而不是java.util.ArrayList)。
剖析JDK源代码可以发现,java.util.Arrays.ArrayList(就是转换出来list)它是继承了java.util.AbstractList这个类。
再来看看java.util.AbstractList类是啥样子的?可以发现
public E set(int index, E element)
public E set(int index, E element)
public E remove(int index)
public void add(int index, E element) | public boolean add(E e)调用add(int index, E element)
以上方法的实现全部是抛出UnsupportedOperationException异常。
因此有Arrays.asList转换出来的List他其实是一个AbstractList,他可以像List一样访问,但是不可其做任何修改操作。
这也说明了,为什么Arrays.asList出来的List,对其做add、remove操作为抛出UnsupportedOperationException异常,从JDK代码角度上,原因在此。
换句话说,其实java.util.Arrays.ArrayList其实只是对数组做了一个装饰,可以看到里面的实现,E get(int index)、E set(int index, E element)等方法都是对数组的操作,他的目的只是提供了可以像访问List那样来访问数组而已。本质上其实还是一个数组。
Dos批处理命令-拷贝文件夹下的多个文件
接到勇发的问题:
用批处理命令实现从一个文件夹下的文件1.txt,2.txt,3.txt....拷贝到另外一个文件夹中..
立刻网上搜索学习了下,写了如下批处理:
for /l %%i in (1,1,3) do copy d:\test\%%i.txt d:\test\sub\%%i.txt
pause
上面是一个循环拷贝文件,其中/l 表示以增量的形式从开始到结束的一个序列,其实变量%%i就是表示这个数字,in(1,1,3)表示开始值是1,增量是1,结束值是3,就是表示变量i从1到3,加上后面的copy语句,就是拷贝文件夹d:\test\1.txt~3.txt拷贝到d:\test\sub目录下。
其实,如果d:\test目录下如果只有我们要拷贝的文件,可使用更简单的方法:
@echo on
copy d:\test\*.txt d:\test\sub\*.txt
pause
上面的意思就是将d:\test\目录下的所有txt文件拷贝到d:\test\sub目录下,同样也达到了效果。